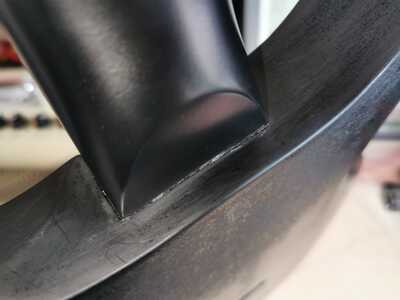
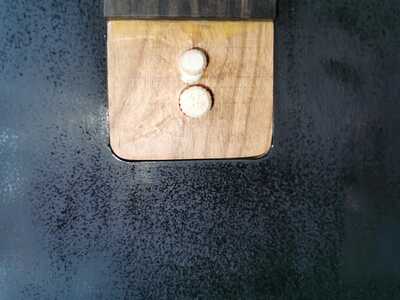
When I glued this neck into the body, the neck joint looks a little scruffy, has anyone any ideas of how to make it look better?
It was all fine during dry clamping but what I think has happened is that when I’ve added glue and clamped it, the clamps have pulled the neck forward ever so slightly and revealed the edge of the paint mask line on the neck. There is also a bit of excess dry glue showing and it all contributes to having a less than perfect looking neck joint. I don’t think it will have an effect on tone or sustain but aesthetically, it’s annoying me and this is for a customer too. If it was mine, I may overlook it but I want it to be right for my customer. It’s only maybe come forward .5mm, maybe less but enough to present a bit of an eyesore.
Should I leave it?
Should I try and fill it somehow?
????????
Bear in mind that I will be masking the neck off to put some final coats of paint and lacquer on the body to cover the neck joint on the top. I don’t really want to mask away from the neck joint on the neck itself to try and cover the problem because I don’t think that is the solution and it will leave an ugly sharp edge and make things worse.
Any help would be much appreciated. @markbailey and the rest of our wonderful community. 👍
Cheers.
Boo.
Make guitars, not war 🌍✌️🎸
@boo Could you clean off the sharp edges and put a small fillet around the joint, maybe an epoxy filler, then paint it again.
My tuppence:
1st pic - Back of neck join: Use a fine line black pen to cover the white bits...spray over.
2nd pic - Top of body: Ignore it. Will be hidden by scratchplate (I hope!)
Measure twice, cut once...
@markbailey Thanks Mark.
1. Yes, I’ll order a fine marker, that seems like an easy fix.
2. It’s not having a scratch plate so I’m going to fill any gaps, sand it, then use high build primer over it. I’ll sand it flat and paint over it. This is a faff and a lot of work but I wasn’t worried about this bit, it was the back I was worried about.
My customer knows it will crack and show after a while, especially with it being nitro paint, but he wants it to naturally degrade/age/relic.
I’ve done this process before, like on this one.
Who’s scruffy lookin’?
A fine line pen was my thought as well.
Why did you paint them separately?
Practice on scrap...
@mattbeels “Laugh it up, fuzzball”
I wanted to try painting them separately to see if it would be easier and cleaner. It is in some respects and if I didn’t have to fill and paint over the tenon, it would be done by now.
Nice work there Robin, thanks for the suggestion, it’s one option
I can't claim credit for that work @boo , it's a shop bought guitar from many years ago. I just showed it as an example, I can't actually see the joint in it.


