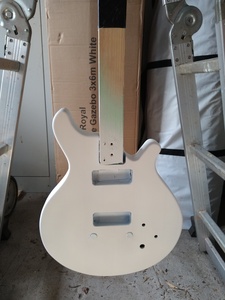
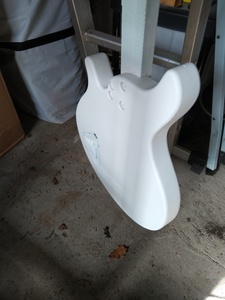
Today finally the weather conditions where good enough to start on finishing my latest built.
There seems to be some sort of a consensus that humidity is more important then temperature to decide if the weather is good enough to start painting. Some people say not above 50% humidity, others will say 60.
Then I found this piece of information on this rather vintage-looking website
A general rule for spraying lacquer (or shellac) is don't spray if the relative humidity is above 65%. A more accurate guide is don't spray if the dew point is within 20 degrees of the ambient temperature. For example, if the dew point is 65 degrees and it's 80 degrees in your spray area, don't spray unless you use retarder. You need more than a twenty degree difference between the dew point and temperature to be safe.
So the dew point should be at least 7 degrees Celcius ( ~20 degrees fahrenheit ) lower then the environmental temperature.The dew point is actually a weird calculation with some fixed number I could not care about. You can find an online dewpoint calculator here
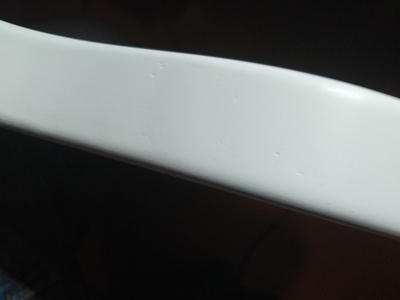
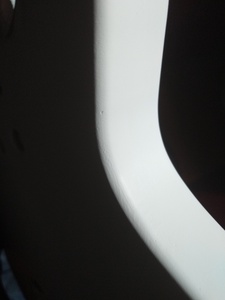
So I am starting with primer and I notice that after all that sanding and sealing, I still have minor little holes and dings, scratches, which I did not notice at all until I started to put the primer on ( see last 2 pictures )
I also had some runouts, when I had the spray can too close to the body, I sanded those away this evening.
But I wonder, what my options are to remove this little imperfections.
Do I need to get rid of them now? or do I just go on with color?
It is nitro, so very thin layers.
If I need to get rid of them before applying color, can I try to fill them with sealer, or shellac, then continue with nitro color? or do I use filler?
If you want to get rid of the imperfections you’ll have to do that before proceeding. If you leave them they’ll still be visible no matter how much lacquer you apply. I’m no finishing expert (yet 😉) but I’d guess filler would be best. Looks great regardless, good luck!
Practice on scrap...
I also had some runouts, when I had the spray can too close to the body, I sanded those away this evening.
But I wonder, what my options are to remove this little imperfections.
Do I need to get rid of them now? or do I just go on with color?
It is nitro, so very thin layers.If I need to get rid of them before applying color, can I try to fill them with sealer, or shellac, then continue with nitro color? or do I use filler?
Short answer: Yes, sort them all out now. 👍
Long answer: Yes, you must fix these imperfections now before you go any further or you will still see them once your colour and/or clear coat is sprayed on. As you are using nitro, it is applied in really thin layers, lots of them so it is no good for attempting to fill/bury these holes/imperfections. You need to use something thicker/viscous such as sanding sealer or even a bit of grain filler. Sand the affected areas back a little with some 320 (this will help to start smoothing the problem out already), clean the areas off and then fill the deeper holes etc with grain filler and leave to dry. When dry, sand them flat with some 320 over a small flat block; you may sand through your primer in and around those areas but don’t worry.
Clean everything again and then spray some sanding sealer on the affected areas in several coats, making sure to spray as evenly as you can and don’t spray too much on at once and give each coat enough time to flash off before you put the next one on. After a few coats, leave it to dry properly for a good few hours, over night. Then sand it back a little but don’t rub through and then clean everything again.
Then, spray more primer paint on the repaired areas, building up a few layers, lightly and consistently and leave to dry over night. Then give the whole guitar another light sanding and clean, again. Constantly check to see if your paint repairs are ok and that everything looks good enough to accept your colour paint.
The colour paint will be totally unforgiving so if you have any concerns about anything, you need to sort it out now. When you are happy with your preparation work, get your cans in a bowl of hot water to get the paint ready to spray. After about 15 mins grab a towel, grab your cans out of the water and dry them off, now you are ready to spray. Make sure you have a proper breathing mask on and your guitar is clean and in a well ventilated area and start spraying in light coats; don’t go too wet or it will run/sag and you will end up having to go back to the sand paper.
The finished paint will only look as good as the preparation work will allow it to be. You will only get out what you put in.
Hope this helps, don’t let this get you down, put the time in with the prep work and then get painting. It’s easy to get excited and reach for the colour paint but it’s always worth taking the time to get it right.
It also depends on how perfect or not you want your finish. If you want an impeccable finish, you must put the time in. On the other hand, you may be looking for a not so perfect finish or even light relicing, so you don’t necessarily need to be so critical. You make the decisions.
Let me know how you get on, ask any questions you want and I’ll try to answer them. 👍
Happy painting.
Make guitars, not war 🌍✌️🎸
@koendb Your guitar is looking great by the way. Sanding and finitting is tedious and more difficult than expected sometimes. At least when a guitar is being painted, we can use fillers, primers etc to hide things that we missed the first time around. We have to be 10x more critical when all the beautiful woods we use are going to be on full display, way more finitting.
I’m looking forward to watching your progress with this build.
just keep everything as clean as you can to cut down on contaminants and that includes from your hands. 🤗
Make guitars, not war 🌍✌️🎸
@Boo Thanks for so much detailed explanation, seriously appreciated!
So I started by sanding it down with 400, as I did not have any 320 left, in some spots I went through the primer, but that s ok.
Next, I used rustins mahogany grain filler, which accentuates the spots pretty good while filling. Not sure if I am applying it correctly, but I use it straight from the jar, rub it in, then use some mixture of grain filler and white spirit to spread it out a bit more. I ll leave it to dry overnight and see where I am at tomorrow, either sanding it smooth, or applying some more first.
then sanding it back after I get some more 320 grid, clean with naphta, followed by a few coats of sanding sealer.
Reapply a few coats of primer.
Does that sound right?
then sanding it back after I get some more 320 grid, clean with naphta, followed by a few coats of sanding sealer.
Reapply a few coats of primer.Does that sound right?
@koendb It looks like you have applied quite a lot of grain filler so I would start sanding it all back with some 150, then move the 240 and then 320 before you get down to the primer. Use a small block to wrap the sandpapers around, if you just use it with your fingers, you will be sanding grooves into it all instead of keeping it flat. Once you have sanded it and you think it’s all flat, see if there are any holes/scratches/marks/dings etc left. If there are, just fill them with small amounts of filler, leave to dry and sand again until everything is filled and flat.
Then, when you are happy with it all, sand the whole guitar with 240, clean and then spray the whole guitar again with sanding sealer, several coats and leave to dry properly. You can then sand it back with 320 and I would finish sanding it off with 400 too but don’t rub through the sanding sealer. If you do, spray more sanding sealer only onto that area in several light coats, build it up to be a thick coating. Let it dry and sand it again carefully. If you don’t do this, when you apply your paint, you will start to see those areas you sanded through. They will always be visible no matter how much paint and lacquer you spray on. They are called “witness lines”.
If in any doubt, fill the holes, sand them back, spray more sanding sealer, sand it back, clean it all off and check to see if you have missed anything. If stuff needs doing further, repeat everything until it’s all done properly.
Only then will you be ready for coloured paint and lacquer.
Remember
“Wax on, wax off” (Mr Miyagi)
or
”First you must learn the ways of the force” (Yoda)
and
”Do. Or do not. There is no try” (Yoda)
🙂
Keep going, keep the faith and cart on. Let me know how you progress. 👍
Make guitars, not war 🌍✌️🎸
Right, so I've now also learned that this is a job better suited for during daytime, as now i can see more little nicks and dents.
My guitar seems to have measles now 😉Should this dry overnight? or should I be able to apply sanding sealer in the afternoon ( after inspecting and sanding )?
@koendb Ah, that’s looking better already. What grain filler have you used? What does it say on the tin for drying time?
Make guitars, not war 🌍✌️🎸
@koendb Just so you know, this is quite normal to be refilling, it’s all part of the process.
Just to shift the topic to car bodywork for a minute, using car body filler is done in multiple stages. When filling dents etc in car body panels, you would initially get a load of filler in there, let it dry and sand it back; it’s soon obvious where more filler is then needed. Clean the area, mix some more filler and apply it to the area and leave to dry. It’s then sanded and shaped, and if more is needed still, repeat until it’s right. The general rule is that each time you have to apply more filler, you will need less every time. Once the whole thing is the correct shape, it is blown off with the airline, cleaned and you will notice tiny “pin holes” on the surface of the filler, these are then filled with “stopper”, which is a very fine filler. This is then sanded back carefully and leaves an almost perfect surface. We then spray on a “high build” primer paint in several coats, this is effectively liquid filler really. When cured, this will be wet sanded through the grades and finished with 800 grade paper. The rest of the panel is prepared and cleaned and is now ready to accept the colour and clear coats. If any of those preparation stages are missed out or done badly, they will all be seen when the paint is applied. No amount of paint and clear coat will cover up bad preparation.
So we can take these same principles and apply them to paintwork on guitars. The only difference is the substrate, we are now working with wood, not metal. So we have to substitute some products for more appropriate ones for the substrate material. I am still learning about products for us on wood, rather than metal, I’ll never stop learning, there will always be something new.
Make guitars, not war 🌍✌️🎸
@koendb Sometimes if I want to do something much faster, I will use a two part filler, this dries by chemical reaction instead of air drying, you can sand it after a few minutes. Obviously I get that idea from car body filler but there is some very similar wood filler that is mixed in the same way, it’s good stuff. I’ll dig it out and take a picture.
Make guitars, not war 🌍✌️🎸
I admire your dedication and patience
It strikes me, reading this thread, looking at the photos and reflecting on @Boo's guidance, that "dedication and patience" are absolutely essential for spraying.
Any little imperfection in the bare wood will always show through.
Stop, fill, sand and start again.
Any little imperfection in the primer coats will always show through.
Stop, fill, sand and start again.
Any little imperfection in the colour coats will always show through.
Stop, fill, sand and start again.
Any little imperfections in the top coats will always show through.
Stop, fill, sand and start again.
In building a guitar;
- time required to do the woodwork and electronics = 3 days.
- time required to do the fretwork and set-up = 2 days.
- time required to do the spray job = weeks, weeks, and weeks.
Boo is clearly a very dedicated and patient man!!!
Online guitar making courses – guitarmaking.co.uk
Use a small block to wrap the sandpapers around, if you just use it with your fingers, you will be sanding grooves into it all instead of keeping it flat.
The devil is in the details! This what I did not do! Ok next sanding will be with blocks. I never put pressure though, just 'dusting it off' and let the sanding paper do its work.


