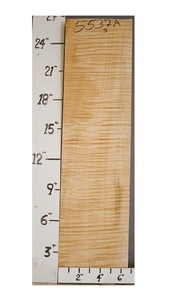
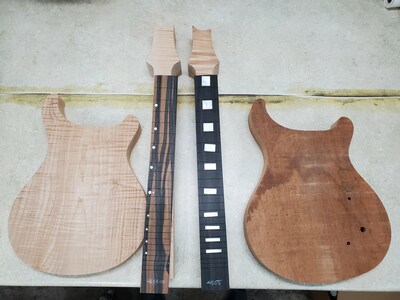
So probably 6 or 7 years ago I saw a one piece flamed maple blue Suhr and thought that was one of the coolest looking guitars I've ever seen. It was $7500 so there was no way I could afford it. This year I decided I wanted to try to build a PRS Custom 22 type guitar, and upon going to my local specialty woods store, they sent me to nwtimber.com. There I found a beautiful piece of flamed maple just big enough for a one piece body, that got me hooked on the idea. It wasn't cheap, the body wood cost just under $450 but I think it was worth it. Here's a photo of the body blank.
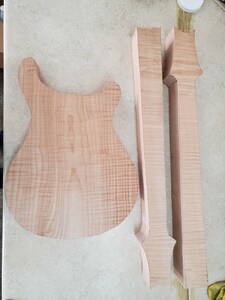
I've always loved PRS guitars that have a flamed maple neck as well, so I went searching the website for a neck blank as well. Also not cheap, $250 but here's what I found.
So here are the base materials for the build. I haven't gotten too far, but I'll make a couple more posts on the thread of my progress so far.
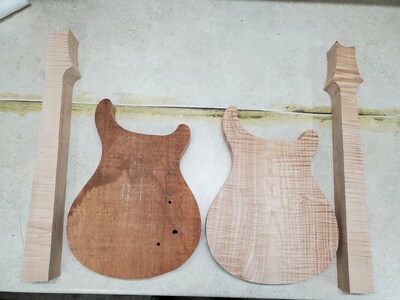
I ordered some templates from Guitar Building Templates out of Florida, left my wood in the attic for a couple of months to dry, and did a rough cut on a newly acquired small band saw. Here was the result.
I was able to get two necks out of the one neck blank, I'm working on the less desirable one first just in case I make any mistakes.
Is this your first build, I'm a novice, just putting the finishing touches to my first build now. I've made lots of mistakes along the way. My advice would be to watch all the videos on Mark's electric guitar course before you do anything else, then watch again as you're at each stage following the sequence that he shows. And have some practice with the router before you let it near that beautiful maple.
@robin me and my dad did a custom guitar about 8 years ago. We bought a stewmac neck and modeled the guitar after an Ibanez that I had, and still have. So I have some experience with woodworking and guitar making. I know a lot more about guitar anatomy and wiring than I did then. I'm trying to take it slow, trying to gain as much knowledge as I can on each part of the build process before doing it because I really don't want to mess this wood up.
Wow !!!
Are you building a solid flamed maple (1 piece) body?
That’s going to be a bit special / unusual.
Normally, a 1 piece cap is special enough! Not surprised that piece of wood was so expensive if it’s around 2” thick.
How heavy is it?
Online guitar making courses – guitarmaking.co.uk
mmmm wood porn 🙂 That's going to look so good ... You worried about weight or just going to suffer for your art?
Guitar making is the art and science of turning expensive wood into sawdust.
@rockpile99 it's not going to be a super thick body thankfully, so hopefully that will help with the weight. If it comes out at 12lbs I'll just have to suffer. At least it will look great on the wall and the wall hangers won't complain about the weight.
- @tv101 it's just under 2" but im going to be putting a deep carve into it and planing the top down for the neck angle and a decent sized belly cut so hopefully it won't be too heavy. I haven't weighed it yet, but I'll weigh it when I'm closer to final dimensions.
I only ask about weight because it’s unusual (in my experience anyway!) to use something like flamed maple for a solid body.
More typically you’d use that for a stunning cap on top of a plainer (and probably lighter!) wood.
A 2” cap would give you at least 3 really thick caps - so you could create 3 stunning guitars from that one piece.
But then it wouldn’t have the stunning back like that Suhr does ....
Online guitar making courses – guitarmaking.co.uk
So I got scared working on the $450 flame maple body so this weekend I went to my local hardwood store and bought a piece of mahogany big enough to make another one piece body. Now having some practice, more research, all the tools i need now, and not caring as much, I got farther with the mahogany body in 4 hours than I did in 4 Saturday afternoons. Followed crimson custom guitars' advice and went out and bought some paper to make full scale plans. I'm feeling a lot more confident in how it will all work out now.
Im gonna make the mahogany bodied one a silverburst since I'm not gonna put a nice top on it and I've still got to figure out the color for the fully flame maple one.
@94dodgedude They are absolutely stunning pieces of flame maple. Like others have said, it is unusual to use such a large chunk of one piece body blank but it will look stunning. Keep the photos coming and for goodness sake, take your time. You really should watch Mark's videos on here, I think you will learn a lot and it may aid and confirm your worries/concerns about building this guitar. Give it a go, study it and don’t forget that we are all here to help. Good luck sir!
Make guitars, not war 🌍✌️🎸
so this weekend I went to my local hardwood store and bought a piece of mahogany big enough to make another one piece body.
I reckon that's a *very* wise move!
👍
And I'm madly jealous that you can just go to your "local hardware store" and buy a nice big chunk of mahogany!
Online guitar making courses – guitarmaking.co.uk
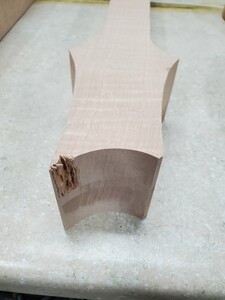
I'm so glad I have two necks! I messed up the top of the headstock on the less nice neck.
The router grabbed it and tore out a chunk. Bummer, but I decided to change the headstock shape which will fix the issue. I'm gonna make this neck the Santana headstock shape. Here's the new drawing for the top of the headstock.
Also got the spindle sander out to clean up my edges on the bodies and the neck for the mahogany body today. Now they're all cleaned up and smooth. Scared to router out the nice neck after the tear out now.
Last thing for this post, got my fretboards and inlays in and they're gonna be great I think. Mother of pearl blocks for the mahogany body on an ebony fretboard and mother of pearl 7mm and 4mm dots on a crelicam ebony fretboard for the flame maple body. Hoping to get more done tomorrow.
Scared to router out the nice neck after the tear out now.
It's coming on well. Take your time with the router, little cuts at a time and stop short of the sharp corners. I was already afraid of my router before I did my headstock, so I hand carved the shape with a chisel.
I would strongly advise that you sign up on the course...even just for a month could help a lot. If you do things in the wrong order you can make your life A LOT more difficult (maybe almost impossible).
Measure twice, cut once...
Thanks. Watched the livestream when I woke up today and could tell I'm in that group for sure. I'll be signing up soon. Thanks for all the help!
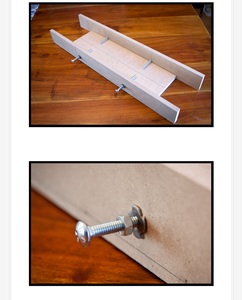
So in looking at just the first section of the build your own guitar course I've done things in completely the wrong order. Whoops. Started before finding the channel and had been following a bunch of different people and what they all do. That being said, I need to router out my truss rod slot now and now my neck isn't an easy to do rectangle. I found this jig design that seems pretty easy to make.
Any thoughts on this or any better ideas of how to route out a truss rod channel on a neck that's already cut to shape? Thanks


