Clean work, nice!
I‘m a mad Buckethead fan from waaay back, his use of the kill switch is great!
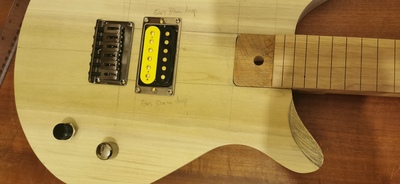
Personally I don’t like the arcade switch, I think it’s too big but to each their own... it works for Big B.
In case you didn’t know, Shadow makes a Killpot, a momentary switch built into a pot. It can be wired as a volume or tone and comes in all the normal values. The pot stays put at 10 so you don’t accidentally lower your volume during use and it only takes a bit of extra pressure to roll down. I’ve used them and they work well, although the wiring diagram is a bit convoluted.
Obviously you have already drilled two holes so it probably won’t work for this build but maybe in the future?
Or, you could use it anyway and add a mini switch to that small hole for coil splitting or my preference: series parallel wiring.
Have fun deciding!
Practice on scrap...
In case you didn’t know, Shadow makes a Killpot, a momentary switch built into a pot.
@mattbeels Thanks Matt, I didn’t know such a thing existed, I’ll store that info away for next time. This is my first kill switch project so it is fun trying to decide which switch to use. Love it all. 🤘😜🤘🎸
Make guitars, not war 🌍✌️🎸
Here’s how to wire a killswitch, I would go for B as the switch is always grounded and probably helps reduce popping...
Practice on scrap...
Here’s how to wire a killswitch, I would go for B as the switch is always grounded and probably helps reduce popping...
@mattbeels This saves me a job, thanks Matt. 👍
Make guitars, not war 🌍✌️🎸
Yes - agree with choice of B - option A leaves you in the same situation as an amp with a guitar lead plugged in - buzzzzzzzeeeee!
@forcesterbill Thanks for the second opinion Bill, much appreciated. 👍
Make guitars, not war 🌍✌️🎸
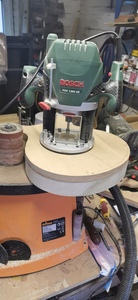
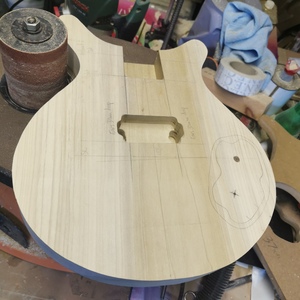
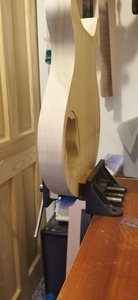
Did a bit more on the Bandsman today. Routed the external body shape and a bit on the bobbin sander. Marked out other bits for removal or carving.
Make guitars, not war 🌍✌️🎸
So, building for customers eh? Damn dude, you’re in the big leagues now...
Why not ask your custy which switch he’d like? Or am I missing something?
@mattbeels 🤣 Hardly big time. 🤣
Yeah I forgot to mention that this one is for myself, it’s a practice run (a prototype) before I make one for my customer. It’s the same spec as the one he wants and we are still ironing out the details. He specified a kill switch but never said which one.
Make guitars, not war 🌍✌️🎸
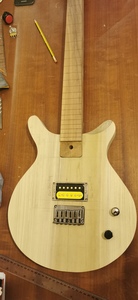
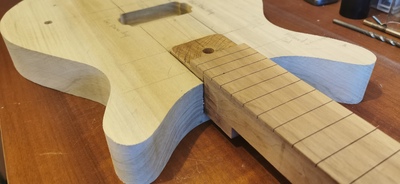
I think I read in an earlier post that you aren’t going to use a pickguard on this one?
How about a top?
Just thinking that to permanently hide that neck joint is highly unlikely, unless you’ve got another trick up your sleeve?
Practice on scrap...
I think I read in an earlier post that you aren’t going to use a pickguard on this one?
How about a top?
Just thinking that to permanently hide that neck joint is highly unlikely, unless you’ve got another trick up your sleeve?
@mattbeels You did read correctly, I will not be having a neck pickup or a cover. I do have another trick up my sleeve, an experiment.
I plan to get the neck heal dead flat with the body, I will fill any holes, gaps etc and sand everything flush, using a straight edge to check it as I go. I’ll then use some 2k high build primer to cover the lot. I know a lot of people will think that is crazy but the majority of that will be sanded off again. I can then apply the colour (black base coat) and then a few coats of 2k clear (matt).
I am using the skills I have from my automotive repair and refining years. It’s a transferable skill and the processes are the same but I’m also aware that paint has an effect on tone when applied to guitars and/or other musical instruments. My plan is to end up with as little paint on the guitar as possible.
This guitar is my prototype before I make the real thing for my customer. It’s a strange set of specifications he has asked for so at least this is different, scary and exciting at the same time. I did toy with the idea of putting a cap on to cover up the neck joint but I wanted to try another way. He did also want a tree of life inlay on the fretboard but I couldn’t find one in a 24.75” scale length. We are now going with an ebony fretboard with simple coloured inlays (yellow dots). That is for his build, this one is a prototype for me which will have different colours and it’s 25” scale length.
I hope I’ve explained this ok. 🤣🤘
Make guitars, not war 🌍✌️🎸
Best of luck with that. I would be worried that whatever you use to fill the gaps will shrink over time leaving you with an ugly, shit-eating grin...
@mattbeels Yeah I’ve thought about it but 2k filler doesn’t shrink and I’ve seen someone else use it in the same way. This is the cool thing about experimenting, you don’t really know until you try. Fingers crossed. 🤞😬🤞
Make guitars, not war 🌍✌️🎸
Looks great, with a customer specified design I imagine that this in many respects makes the process easier in that the decisions are made but challenges you to do different layouts and configurations, kudos.
Is this your second build or second Bandsman?
Give up the news folks, it’s liberating!
Is this your second build or second Bandsman?
@peebee Yeah it can make it easier but I like it when I get a bit of artistic licence too. If you look at this one on paper, it looks simple but there are a few things I haven’t done before and that have made me think, it’s a good thing.
This is my second Bandsman, it’s gonna look mean. After I’ve built this one (this is a trial run, a prototype for the actual build) I will make the one for my customer. I am going to send him this one so he gets the feel of it and he can give me feedback to see if there is anything he wants to change. I wanted to build another Bandsman anyway so this is all good practice.
I have built many guitars now. I have always messed around with guitars from being a teenager and eventually moved on to building kit guitars. I found Mark’s website about four or five years ago, built my first bandsman at home, using the online courses and I’ve never stopped since. I build mainly bolt on type electric guitars but I need to keep up my practice with set neck as well. I am obsessed with it now and have made several for customers.
Make guitars, not war 🌍✌️🎸
@boo, great answer. I like the fact that you are building this one first as a 'practice' and then lending it to the customer to try and then make adjustments / alterations as necessary. Obviously not possible with all builds but a great idea, plus you get to see that challenges in making a design and then perfect as you see fit for the customers model.
I am doing my first build, essentially a bandsman, and I am practicing first on scrap, unfortunately I only found this fantastic resource middle of last year, I am not sure why it hadn't appeared in my suggestions before hand as I had been watching guitar building channels and sites for a few years now, this one though is the best I think as it goes into detail on all aspects.
Give up the news folks, it’s liberating!
Try this for hidden tenon. When you cut your body blank, save the bottom scrap part of it by the heel long enough to cut out a mini cap specifically for the neck tenon. You will be surprised on how the grain pattern lines up to the body really well. I surface route the bottom part of the mini si the cap is undisturbed to line up the grain oattern. I actually use the neck tenon as a guide to mark my cuts. I leave a 2mm overhang on the mini cap towards the end of the tenon so I can sand the end edge to where it meets the body to accomodate for the neck break angle gap. I cut trim the thickness of the neck tenon in accordance to the mini cap leaving the cap a hairline proud of the surface of the body for sanding and for the sawdust to fill in the the glue lines. I glue the neck and minicap the same time and wait for the glue to harden a bit and do a prelimanary sanding with just 220 grit just to seal the lines. Once dried I then do a finish sanding and flush the mini cap to the body. To the untrained eye, it goes unnoticed. Looks like it’s just part of the grain pattern.


