My other topic here "current build" is now at the finishing stage. I have a tendency to rush that stage, which generally ends up taking a lot longer when I have to remove the finish that I've rushed and start again!
To stop me doing that, here's another build that I'll do in parallel with finishing the other two ...
It's Idigbo, and has some interesting features/grain patterns in it. I thought a carved top and oiled finish would work well.
Except it's a heavy beastie. 6lbs 6oz as-is.
Too heavy.
🙁
So, the solution is to hollow out the body from the back, and add a back.
I had an offcut from the plank which was wide enough for me to slice on the bandsaw and give me a "bookmatched" back. Except the depth of cut on my bandsaw is about 0.5" short.
🙁
So, take 1.5" off the edge of the offcut, and make a 3 piece back instead!
That's 3 bandsawn slices from the offcut, then thicknessed down to 10mm.
And here they are being joined on my Bailey-designed jointing jig (I'd already jointed the first 2 pieces, this pic shows the 3rd piece being added). My extendable Bailey-designed jointing jig fits all 3 pieces!
After some time on the drill press, the body is now down to 5lbs 2oz. Still too heavy, but I reckon that, by the time I've tidied up all the drill marks and smoothed out the edges with the router, and make the neck & pickup cavities, it'll be under 4.5lbs, which I can probably live with.
Online guitar making courses – guitarmaking.co.uk
Neck pocket cut, and checking alignment to mark out the position of the bridge and pickup cavities ...
Not planning anything too fancy for this - standard couple of HBs with a 5-way superswitch from StewMac (which gives various options on combinations of the HB coils)
But it *will* have a carved top ...
... should only take a few days of sweating to get it carved and sanded!!
Online guitar making courses – guitarmaking.co.uk
Seem to have neglected this thread a bit ...
I had a bit of an "event" when carving the top - admitted to in the "whoopsie" thread in the things-gone-wrong section of the forum here - which caused a bit of a delay in the project.
In short, I carved through the top, creating an unintended hole in the top.
Which got repaired ...
That's a piece of offcut, cut so that it could be fitted through the hole and then pulled (using the screw) up tight against the underside of the top, with a bit of superglue dabbed to keep it in place.
Then filled with sawdust/glue and rubbed down, refilled and re-rubbed down.
And it now almost done
Online guitar making courses – guitarmaking.co.uk
But the main purpose of this update was to share the slot-cutting technique (following a Q on one of Mark's workshop broadcast sessions).
I'm using a StewMac Superswitch (or might be called Megaswitch - don't remember! on this build. It gives all the tapping options via a 5-way switch rather than using push/pulls.
But it needs a slot cutting!
Step1 was measure, mark, and then remeasure. Drill the holes at either end for the screws to hold the top in place.
Then, using the screws to check (and double check) the thickness of the top in the switch area, I routered the top down as much as I dared. It's about 2-3mm thick in the switch area. The rest of the cavity is about 5mm thick.
Then, I used a knife to score the line that I needed to cut through for the switch, and then a 1.7mm drill bit in the dremel, in the dremel router base. The scored line helped keep the drill bit in a reasonbly straight line
Straight line, but a bit wobbly ...
Then file out the drlll bit marks in the slot. The masking tape acts as a straight line indicator.
Not quite perfect yet - this was a test fit to check that the slot was wide enough, and long enough, for the switch to work properly (it was!).
Online guitar making courses – guitarmaking.co.uk
It's time for the oil ...
The wood (Utile) is quite open grain - which makes it fairly rough to the touch (compared to something like maple), even after lots of sanding.
So I used some non-scratch scouring pad to apply the oil.
That seems to have the effect of a very soft abrasive and creates its own Utile-grain-filler-and-oil mix which fills in the open grain in the wood and creates a pretty smooth finish.
Well, it works for me!
Online guitar making courses – guitarmaking.co.uk
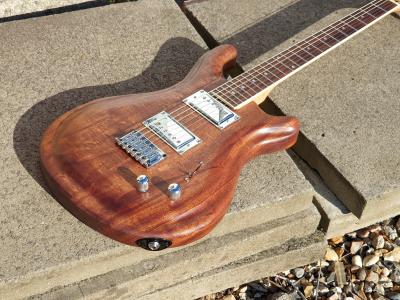
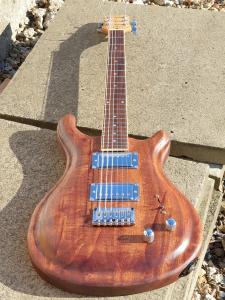
And it lives ....
This took a few unplanned turns along the way, but I think it turned out OK.
To be honest, if putting guitars were just a matter of fixing A to B, cutting C to fit D, and then adding a bit of E, F & G, it'd all be a bit boring and nowhere near as satisfying.
I do seem to have a bit of a tendency to self-impose the interesting-ness to some builds though.
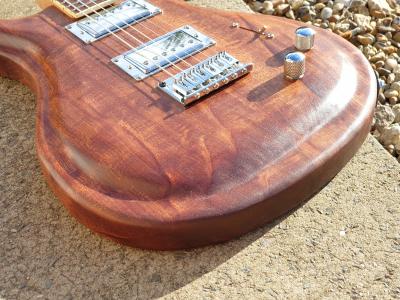
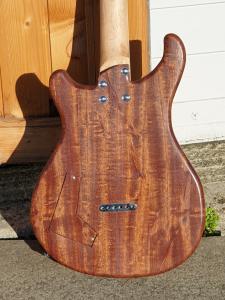
Anyways, enioy some pics ...
Yes, the switch tip is missing, and I need to get a chrome jack plate (which is why the black one isn't screwed into the body yet), but it's strung up, tuned, intonated, and it works as it should.
Pair of Iron Gear Rolling Mills pickups for anyone interested.
Online guitar making courses – guitarmaking.co.uk
I'm chuffed with the hole-save. And getting the 5-way switch slot cut just-so. And with the cavity cover ...
The timber (Utile) for the body cost me something like £30 for the 8' plank. Enough for another body or two if I cut it carefully.
?
Online guitar making courses – guitarmaking.co.uk
Cheers @russ.
I had some luck with the wood having lots of natural colours and features in it, so the filler that I used gets completely lost.
You can spot it close up, but it really does just look like a natural feature!
Online guitar making courses – guitarmaking.co.uk


