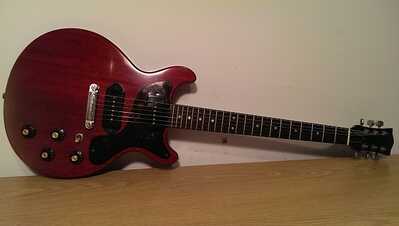
So, when I was a lot younger, I had one of these:
It's an Aria ET 240, a 70s Japanese sort of copy of a LP Junior double cut. It had quite nice tone, and was nice to play apart from 2 vices: severe head dive, and worse than that, a problem with the neck such that whilst playing, there would be a loud click and the neck would move into a new position, knocking it out of tune. I could probably fix that now, but at the time, I thought that it was terminal, stripped all the hardware off it and disposed of the wood.
So, for my first project, I plan to build something along the same lines, using as much of the original hardware as I can. I won't use the ugly scratchplate, and will probably also not finish it in translucent cherry red. I might also go for a single volume and single tone control instead of the 4 controls, but I haven't made my mind up yet.
Anybody who knows me will tell you that my normal rate of progress in any kind of project is, well, glacial 🤨 , so updates may not come in thick and fast ....
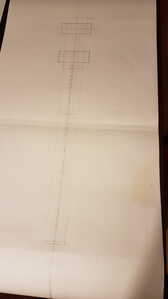
Anyway, I started drawing last night, and got this far ....
(sorry for the really bad picture!).
More to follow ... somewhen 😉
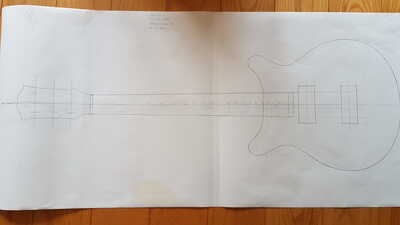
15.12.2021 Updated Drawing:
@steveh Early in the 80's, I must have been around 13 or 14 then, I had an Aria Sunburst Strat copy. I remember swapping it with a cheaper knockoff because I wanted a black one cause that was more metal 🙄 Oh well 🙂 Have fun with your build. Does not matter how long it takes , as long as you enjoy every minute of it.
So, for my first project, I plan to build something along the same lines, using as much of the original hardware as I can. I won't use the ugly scratchplate, and will probably also not finish it in translucent cherry red. I might also go for a single volume and single tone control instead of the 4 controls, but I haven't made my mind up yet.
@steveh What you have in mind is very much like the Bandsman build in the @markbailey online course. Follow that, modify the body shape to your liking and you will get what you want out of your first build. 👍
Anybody who knows me will tell you that my normal rate of progress in any kind of project is, well, glacial 🤨 , so updates may not come in thick and fast ....
There is no rush and it is encouraged to go slow, take in what you are doing and above everything else (apart from health and safety), enjoy yourself. 👍🎸
Good luck and you know where to come when you need help and advice. 👍
Ask you questions here and we will all try our best to help answer them. If we don’t know the answers, then our resident guru will. @markbailey
Make guitars, not war 🌍✌️🎸
Great stuff - good start! Some tips:
Sounds like the neck came loose on the original - probably could have been taken out and reset - but you live and learn...I'm sure we all have a story like that 😛
Most important:
If you want to lose the scratchplate then you will you need to ensure the neck tenon is long/strong enough - you'll want at least 55 - 60mm of gluing surface.
To achieve this they have moved the neck pickup a bit further back towards the bridge than 'normal' (like my bandsman) - so there is a gap between the end of fretboard and neck pickup.
Not using a scratchplate will leave this bit of the neck tenon exposed - this is OK but something to bear in mind.
Can I ask you to upload a couple of pics of the pickups? Do they screw flat onto the front or do they need routing?
Hope that helps/makes sense...if you are not sure about anything just ask and keep us updated with the design so we's can help...
Measure twice, cut once...
@steveh Early in the 80's, I must have been around 13 or 14 then, I had an Aria Sunburst Strat copy. I remember swapping it with a cheaper knockoff because I wanted a black one cause that was more metal 🙄 Oh well 🙂 Have fun with your build. Does not matter how long it takes , as long as you enjoy every minute of it.
Funnily enough, pretty much everything that wasn't made of wood on my Aria ended up liberally coated in matt black paint - I was going through my Matt Black Phase 😆
@markbailey Hi Mark, thank you for your reply. I should have mentioned it beforehand, but the Aria had a bolt on neck. Is that going to be a problem while following the course?
As far as the pickups are concerned, I think that some routing will be necessary. I thought that I had lost one of them, but I remember now that an enterprising mate replaced the bridge one with a DiMarzio humbucker. I'll probably buy a P90 type, for the sake of completeness. The bridge one looks like:
and has a "dog ear" cover like this:
So, it screws to the top of the guitar, but a shallow route is needed.
Thank you for your support 🙂
Steve
@steveh Ah OK cool... 🤔
Yes, you can do that but you might have to mix and match a bit. It is what I might call a hybrid.
I checked your updated drawing - it is not a good design (yet) as there is no access to the top frets - we can fix this in two ways.
Was there an extension on the body for bolting on to like this?
or was it more like this?
(rear view)
Measure twice, cut once...
@markbailey Hi Mark, thanks for your comments. To be honest, I wasn't sure about the high fret access.
It's prompted a bit of a re-think on my part, and I've decided to follow your designs more closely, and if I have a burning desire to reproduce the Aria, I can come back to that another day. The point of signing up for your course was to learn the methods that you teach, so I'll focus on that. And, after all, I'm not expecting this to be the last guitar I build 🙂
I'm partway through revising my plan and will upload a new version when it's finished.
Cheers
Steve
@steveh Good call...I think that is the best course of action. Once you have the methods down you will be unstoppable 👍
Measure twice, cut once...
I won't use the ugly scratchplate,
I agree - generally - that sticking a bit of cheap black plastic on the front of a beautifully built and finished guitar is heresy.
But not all scratchplates have to be ugly, and sometimes they're necessary;
Online guitar making courses – guitarmaking.co.uk
I agree - generally - that sticking a bit of cheap black plastic on the front of a beautifully built and finished guitar is heresy.
@tv101 Hey! I like using black plastic for scratch plate and control covers etc.
No need to be discriminatory. 🤣🌍✌️
#blackplasticmatters
Make guitars, not war 🌍✌️🎸
@steveh Good call...I think that is the best course of action. Once you have the methods down you will be unstoppable 👍
Hi Mark,
So, I finally got round to re-drawing my plan - the original was getting so messy with being rubbed out and altered over and over again, I could hear my old Tech Drawing teacher turning in his grave!
Since the last version, I've changed to 25" scale length, joining the body at the 21st fret (of 22), and I'll use humbuckers instead of the P90s. There's a couple of photos of the plan attached here, and I'd really welcome your feedback, of course 🙂
Other than that, I think I'm ready to start making a mess in the garage .....
Cheers
Steve
Hey there, everyone! So, the project guitar is finished (for a given value of „finished“ - there are some details to take care of yet). But it´s built and it plays nicely - certainly better than the donor Aria did 😀
I really want to say „Thank you“ to @markbailey for the course, which has been a real enabler for me. There have been things that I got wrong first time and had to revisit, as well as things that I‘ve asked myself „What if I did this bit differently next time?“. And the Big Lesson: neck carving is nowhere near as difficult as I expected it to be 🤣 🤣 .There has also been at least one thing where I thought „Hmm, I‘ll get away with that“, which with hindsight, I regret. Ah, well, do it right next time 😉
Next up, 3/4 size Flying V in ruby burst and goldhardware for my daughter …. Like this only smaller. I‘ll set up a project post for it, and this time, I promise to update it as I go …
Watch this space!
Have fun, everyone!
Steve
@koendb yeah, they are! My rubyburst was a kit, but I decided that I didn’t like the pickguard, and moved the control cavity from the front of the guitar to the back. Also, the nut had to come off and be adjusted, as I didn’t plan on playing much slide guitar 😯 and most of the hardware got replaced. When I replaced the bridge, it was clear the the holes weren’t in the right place, so they got filled and re-drilled. It was actually that experience that prompted me to find out how hard it could be to build from scratch 😀
anyway, I’m looking forward to getting started on that project!
stay well, and have a great weekend!
Steve


