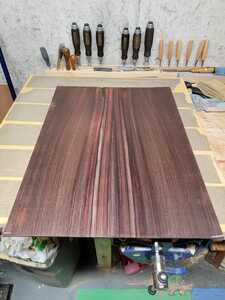
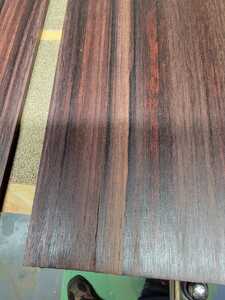
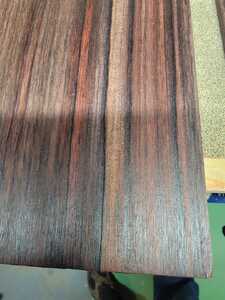
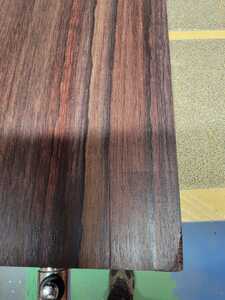
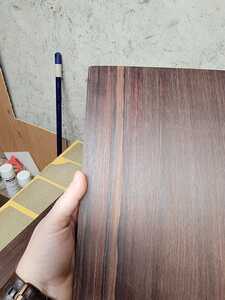
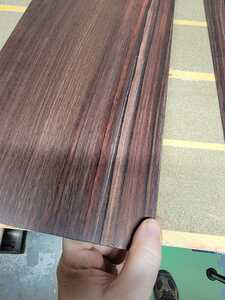
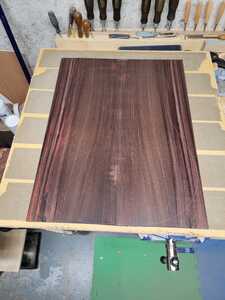
So... I need an opinion on an issue I just seen. I ordered a rosewood back and side set a while back and have had it stacked in my shop for a few month to allow it to get used to my shop. I pull it out to start my plan for thicknessing and I see an inherent crack in both pieces. It is a beautiful piece and, when I seen the grain, I had intended to use the different colors as a feature up the spine. Unfortunately the crack is going right up the part I wanted to use. I circled the crack in my white pencil. If I flip it over, and put the "sap wood" to the outside, I think I would have just enough to make a dreadnaught guitar (I outlined my template). Not as pretty in my opinion with the little sap wood on the outer wings but still not bad. My worry is if the crack keeps going while I'm thicknessing. I feel as though I should address the crack with superglue or something before I start or do you think there is a way to still be able to salvage the pretty feature of this wood and use it the way I was going to at the beginning. I will also be sending a message to the supplier to see what they say. You never know.....
Any opinions would be helpful.
Thanks.
The crack looks like it will split all the way along the board. I think the ends should have been sealed in wax to stop it from drying, so you might have some claim on the supplier.
It’s very big to try and seal with glue alone but you could try shaving a bit from the outside of the board and glue it in. Might take a few thin shavings together.
I’ve never used sap wood in a build, although it looks good it’s a weak point so I would reverse the boards and cut it out.
Some people call me a tool, others are less complimentary. Tools being useful things.
@rocknroller912 That is my worry and belief as well that it will crack all the way down the board. I can push the crack all the way closed and you can't see it is there. I am really leaning towards pushing it together and running a bead of superglue down it to close the crack. Then flipping it over and, after thicknessing and stuff, cutting the crack off. That's what my head thinks but I don't want to rush into this.
If you can close the crack don’t use superglue. I would go for Titebond it’s more reliable in my opinion.
Are you thicknessing with a drum sander. If so think of the heat generated which may affect it.
Some people call me a tool, others are less complimentary. Tools being useful things.
@rocknroller912 I am planning on using my hand plane to thickness it as my homemade sander is out in the shed and it is not just cold in there but it is "friggen" cold. That being said, generating heat should not be a problem. I worry a little about friction and pulling the crack open. My planes are sharp but there is always friction.
I would worry about pulling the crack open with a plane, but a good sharp blade and thin shavings should be ok. In theory it shouldn’t be any different to planing over the centre join.
Some people call me a tool, others are less complimentary. Tools being useful things.
Hi @bpower,
Firstly, you really want to have the stripes up the middle, it is so much prettier that way.
Secondly, if you are going to have a go at fixing this I suggest that you used an adhesive that has strong, structural, gap filling qualities such as an epoxy and superglue just doesn't fit the bill. Even though you can push the crack shut so that you can't see it you just don't know what microscopic voids there may be in the material within the crack. An epoxy will fill these and remain strong, whereas a PVA (Titebond) will shrink and, in turn, tiny voids may form within the glue line which will reduce the strength of the repair considerably. You could also consider adding some thin (0.5 -1mm) cross grain repair strips on the inside similar the central join reinforcement. As the crack appears to be mainly at the lower bout end you'd be unlikely to spot them especially if you make them out of offcuts from the back material itself and taper the edges. Just in case anyone does call you out on it you could always come up with some luthier gobbledygoop about it being part of an advanced experimental back bracing system that you have been developing for NASA forthcoming 'guitarist in space' program!
Cheers
Darren
Good advice from @darrenking I would follow it
Some people call me a tool, others are less complimentary. Tools being useful things.
Thanks for the feedback @darrenking and @rocknroller912. Darren.... I really.... really want to use it with the stripes in the middle. I'm very glad you mentioned about the epoxy. I really did have more worries that the crack is going up further than I can see. I don't know why I didn't think of that first. I have some slow cure flow cast epoxy I used for a casting project I did last year. I'm not sure if that is what this product was designed for but it would definitely flow into all the crevasses. I would just need to figure out a way to not cause a huge mess in my shop.
I'm still going to let this suggestion sink in but I really like the idea of getting to use the board the way I wanted to.
Thanks Darren. 🙂
@darrenking Would that be an epoxy glue or (like @bpower is suggesting here) an epoxy resin? What is the difference?
I know my dad used to use good old Araldite to fix a myriad of broken items. I see that as a glue/adhesive.
I occasionally use something similar to what you have here @bpower casting resin. I’ll find some pics of where and when I used it.
Make guitars, not war 🌍✌️🎸
Hi @boo I seem to remember the original Araldite as being a fairly viscous creamy/yellow colour and this might suggest that it is/was an acrylic based product. They do loads of branded adhesives now so it is a case of picking the right one for the job.
For this type of repair a much thinner, clear setting adhesive would be an advantage as it would flow into the crack better and be invisible once cured. West System resins would also be good. Just avoid any epoxy system that isn't especially runny.
@darrenking I use this stuff to get some great results.
Make guitars, not war 🌍✌️🎸
Looks perfect. It is always worth checking with the manufacturer though, that a product such as this can be used as a structural adhesive as it may have been primarily engineered with a different set of parameters in mind. For a crack like the one we are talking about I am pretty sure this would be fine.
@bpower You may have seen me use this when I make those Barncaster guitars but the principle is the same for what you need. The Barncasters are intentionally left a little rough looking but I fill any deep splits, cracks, nail holes with this resin. I usually add coloured pigments into it for different effects but you could add in some fine sawdust from the wood you are using. Make sure you dam off areas you are filling (if needed) so the epoxy doesn’t run out everywhere, I use special tape as masking tape just soaks it up. When dry, sand it flush and carry on. I use a belt sander but you will need to be much more careful that that. Sand through the grades and apply whatever finish you choose and you will never notice the repair.
You can see my repairs but that is intentional as I coloured the epoxy to contrast to make a feature of it but your will just blend in.
Make guitars, not war 🌍✌️🎸
these forms are awesome. I really appreciate the advice.
@bpower These forums are good and they work well because we support each other, even if there are differences of opinion. We are respectful and considerate of each other. It’s a great system, the more we all put in, the more we all get out. We can display our triumphs to inspire and encourage others, but we can also fall into the safety net of the forums when mistakes are made. We get helped back onto our feet and pointed in the right direction, it maintains and boosts everyone’s confidence in the process.
We all pay in, we all get paid = best system ever
Make guitars, not war 🌍✌️🎸
Update on the crack....
I have used epoxy and I think that it worked absolutely fantastic. Can not see that there was ever an issue and seems perfectly strong. I am confident in it so now I can start the jointing process and get this back going and looking like I wanted it to be.
I would again like to thank everyone for the responses. @boo @darrenking @rocknroller912 . You guys are awesome. 🙂


