Man this build...
Everything that can go wrong goes wrong multiple times it seems!
So while the neck has its issues with badly seated frets and perhaps not perfectly shaped.it is the body I am struggling the most with.
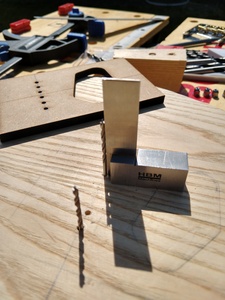
I tried installing the bridge, measured , measured again and drilled the string holes. Bit by bit, always checking that my drill stays square, until half way through the body, aligning the bridge on the back, so I could drill the holes from he back to meet the hole in the middle somewhere.
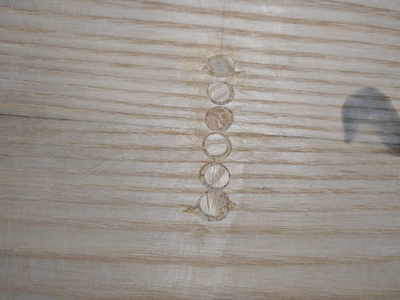
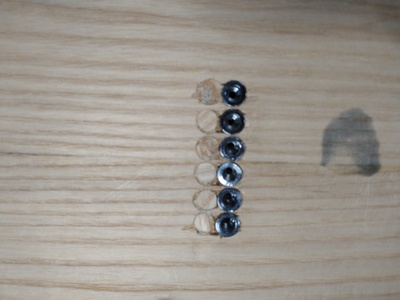
So far so good. Getting the ferrules in was a disaster, I first drilled out about a mm for the ferrules countersink, then drilled with a 8mm drill bit for the ferrules. Although I started out with a perfectly aligned set of holes, the end result was not so pretty.
I decided to leave it and get back at it later. I screwed on the bridge, installed the neck and put on some strings and do a quick intonation to check progress.
While I had to pull the saddles quite a lot backwards, I was not too worried. However, I found that I had to raise the saddles quite a bit. Easy, I just take another mm from the neck pocket and lower the saddles.
While I was at it, I decided to also route the body cavities.
When I reinstalled everything, I noticed a big issue, while I could lower the saddles, Suddenly the saddles could not be moved any more backwards because the height screws of the saddles got stuck on the bridge mounting screws.
Turns out, I did draw a line much earlier on to indicate where the bridge was supposed to be. but took the wrong row of screws to line up the bridge, so I was actually off quite a bit.
I cant believe how I missed that and kept on going ,assuming everything was ok, because I did measure more then twice before!
I decided to call it quits and revisit it the day after.
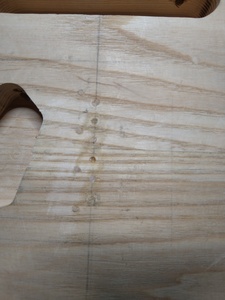
The next day it was patching day, Filling the holes with dowels, cut from the leftover pieces of the body blank., scewer sticks for the smaller holes.
I also had to fill the bridge pickup cavity, which I also made from a bit of Ash scrap block. using a handsaw and a shinto rasp I cut it to shape and glued it in, next day, reinstalled the bridge, string holes and ferrules.
These ferrules are a nightmare, I did use a different method (using a ferrule template ) to install them and it helped somehow, but is still far from good for me, it looks very messy, especially with those patched holes from the previous mistake.
Installed the bridge again, making sure everything was ok and intonation was correct ( very coarse intonation, with one of those headstock tuners, just to get an idea ), I started routing out the bridge pickup cavity again. All looking good!
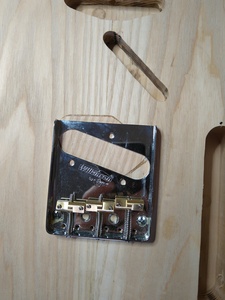
But when I reattached the bridge, I noticed that there is a slight gap on the low E string side just at the bridge pickup. It is not a big deal as it is only half a mm, but somehow I must have misplaced the template slightly.
Making mistake after mistake it seems. It is like I am not able to keep an eye on everything, making sure everything is how it is supposed to be, I focus on one thing, failing to look for other things I guess.
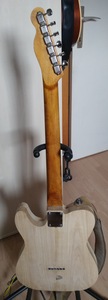
Anyway. Installing the electronics is easy, and that part worked straight away. So now I have fully functional first build.
Still need to roll over the edges, make a scratchplate and decide on the finish, but At least I can enjoy playing it for a couple of days.
And I must say, it is very much playable already! sounds good too and I love the feel of the neck
Making mistake after mistake it seems. It is like I am not able to keep an eye on everything, making sure everything is how it is supposed to be, I focus on one thing, failing to look for other things I guess.
@koendb It is difficult to keep you mind focused and think about everything at the same time.
I’ll come back to this tomorrow when I’ve got time but I need to sleep now.
Don’t worry about all of this, you are learning loads and exercising your repair and recovery skills. 👍
Make guitars, not war 🌍✌️🎸
Getting the ferrules in was a disaster
@koendb I really feel for you on this one, your picture of where the ferrules ended up is very similar to the mess I ended up with on my Tele kit build. Only clean solution I found was pointed out to me on a different thread and was to use a ferrule block in the back to replace the individual ferrules.This is the one I went with, solid chrome plated brass.
Sadly for me the two E string holes weren’t level so even though I’ve done this it’s still at an angle to cover the mess. I also stupidly rushed it and only made a template for the recess and routed the main slot depth free hand. Free hand routing is not my forte, ended up pretty messy and cleaning it up meant I nicked the end he of the hole too. Point being if you do this, make yourself two templates, one for the hole and one for the recess and make the recess one perfect add guide lines to the template edges and mark with some frog tape (actually given the body’s not finished pencil!!) on the guitar body so you align them spot on when you do it. Square the templates to the neck joint too.
This was my one chance to fix this and I’m still not happy with the result but it was all from my own lack of preparation and rushing, learn from my mistake please if you do this. Should note that company sells templates but they’re more than the cost of the part!
…on an elaborate journey to turn trees into music.
Only clean solution I found was pointed out to me on a different thread
@Tej Yeah I know of that solution. It's not what I wanted for this project though. I have not yet decided which way I want to go for this project with regards to finishing, but if I decide to make this a paint/lacquer job instead of stain/shellac/oil finish. I can clean up most of the mess anyway.
At the same time, I will keep practicing getting ferrules in pieces of scrap wood until I can get it right repeatedly, before making another string through design.
On the Flying V project, I 'll be working on after this build, the string through principle is used as well, but the ferrules are located deeper I think, so less of an issue there and they are not in line, so easier on the eye if they don't line up perfectly.
Good suggestion for other possible builds!
Everything that can go wrong goes wrong multiple times it seems!
Sometimes it feels like that, but, in reality, you've got more of it right than wrong, and the bits that aren't quite right are fixable one way or another.
Plus, it's been an opportunity to develop/refine some build-rescue skills. Those are always going to come in handy. TBH, if you managed to make the infill pickup block with just a handsaw and rasp, then I'd call that a pretty neat piece of work!
If the appearance bothers you, then you could either solid-finish it (take no notice of @Boo, it doesn't have to be a solid finish in pink flake, other colours are available), or you could try veneering the front and back. The front will be hidden under a carefully cut scratchplate anyway, but might be "nicer" for front and back to match?
So now I have fully functional first build.
And I must say, it is very much playable already!
So, a good result!
Online guitar making courses – guitarmaking.co.uk
This was my one chance to fix this and I’m still not happy with the result but it was all from my own lack of preparation and rushing,
The number of times I've had that experience @Tej ...
Any job that "I'll just do this quickly" generally turns out to take much much longer!
Online guitar making courses – guitarmaking.co.uk
@koendb other thought I had for this is if you get a loooong drill bit and make a thick drill guide from some hard wood on the pillar drill and then clamp this to the body and use that with the long bit. Of course this assumes you’ve access to one and like me it was just too small to get the body in.
My final thought is to plug the holes again, sand them down and get one of these, put a wide base on the plunge router and clamp that to the body and that “should” be spot on, I have one of these bits to do the bridge mounts on my upcoming build and this was my plan to do it. I’ll be doing some tests shortly, if it’s of help I can try doing a line of them and see how well it works out, it’ll be into soft wood or MDF but should still give an idea of how well it’ll work?
…on an elaborate journey to turn trees into music.
Any job that "I'll just do this quickly" generally turns out to take much much longer!
@tv101 yeah for my proper build I have to keep in mind I’m not working to anyone’s schedule but my own and that speed isn’t the point. Definitely planning to use you guys and Mark as a sounding board before I dive in to fix something! Not that a single thing will go wrong of course, ahem 😉
…on an elaborate journey to turn trees into music.
Not that a single thing will go wrong of course,
I think the chances of a single thing going wrong are minimal @Tej 😉
I still find multiple "learning opportunities" on most builds ...
Online guitar making courses – guitarmaking.co.uk
I still find multiple "learning opportunities" on most builds ...
@tv101 my main aim though is when it happens to be sure that I solve the problem first time without making new problems as I’ve done before. It’s like painting a room where the outcome all depends on the preparation and masking everything well, all of which takes way longer than the painting part. If I treat each operation lesson with the right level of care I should at least minimise problems. Already asked my family to ban me from going near a guitar builds when I’m tired too!
…on an elaborate journey to turn trees into music.
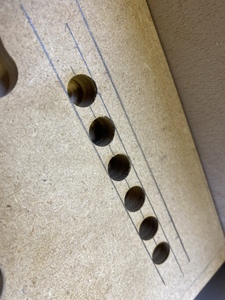
@koendb This was the result of a test with using the router dowel cutter, it’s a soft start router so I got away without clamping it for the test so arguably could be marginally more accurate!
Given the result I’m annoyed I didn’t have the kit to do this when I needed it, only point is that it burnt the MDF a little presumably the resins got too hot as I did each hole in one go. Anyway, gives you another option!
…on an elaborate journey to turn trees into music.
@tej That's very tidy. What was your methodology for placing the holes so evenly? I'm also looking at a Tele style build, and unfortunately top loading tele bridges are relatively rare (I haven't found one that also has individual saddles) so through stringing may be impossible to avoid.
What was your methodology for placing the holes so evenly?
@jonhodgson A square and a sharp pencil, with a bradawl for punching the starter holes. I find it helps to centre the bradawl on the mark if you need to be accurate to have a bright light from one side low down so the tool doesn’t doesn’t overshadow the mark. The cutter I used, if you follow the link in the last post, has a spur on the end like a Brad point bit so can locate perfectly. Just be sure to only go in shallow with the bradawl as you want the smallest point that will still allow you to locate the router.
…on an elaborate journey to turn trees into music.
@Tej,
The router is actually a good idea! You just need to be very careful and have a right sized bit I guess.
It is ideal, because you can really accurately place it and almost no chance of tear-out. just going slightly down. Done
With a set like this: 7PCS-Straight-Router-Bits-Set
You could even make sure the ferules go in straight with the 8mm bit, no matter what.
Does anyone see the catch or issue with this method?
The router is actually a good idea
@koendb I have them occasionally 😛 As suggested before I’d clamp the router down to the body with a wide base plate after aligning it if I was doing this on an actual body, then recheck the alignment. Definitely do a test on the same wood first though. Also check your router for any play, my old one wasn’t great and you couldn’t guarantee perfect 90 degree angle.
Would also love any opinions from people on this method as I plan to use it for a few parts of the build where the drill press can’t reach!
…on an elaborate journey to turn trees into music.
You could even make sure the ferules go in straight with the 8mm bit, no matter what.
@koendb just a thought about this the ferrules I had, had a lip round them so you’d need to cut a wider recess too with a larger bit if you wanted them flush.
So you either need to be able to change the bit with the router still clamped to the body or clamp on guides each time to so you can perfectly relocate the router guide in the same place. Hope that makes sense!
…on an elaborate journey to turn trees into music.
just a thought about this the ferrules I had, had a lip round them so you’d need to cut a wider recess too with a larger bit if you wanted them flush.
Thats indeed the issue, the shaft of the ferules is one thing, but for me, what screws it up is that little lip that you need to cut out, to make the ferrules sit flush with the body. for me it is undoable with hand drill and a brad point.
With your router trick, you can mark out the outer circle for the ferrules lip (10mm), as well as the inner one for the ferrules' shaft (8mm) then first use the 8mm router bit to depth, another pass with the 10mm router bit to get the lip recessed. To make sure you have them all on a perfect line, you just need to make sure to use guide rails, and glide the router between these rails. you can check well enough if the router bit ends up in exactly the spot you want that way.
To make sure you have them all on a perfect line, you just need to make sure to use guide rails, and glide the router between these rails. you can check well enough if the router bit ends up in exactly the spot you want that way.
@koendb I would probably take the additional step of putting a stop for the router for the first hole and then leave that in place while you change the bit then, then move the stop for the second and do both holes for that. From my previous mistakes the smallest deviation from where you want the hole stands out so badly its worth the extra effort!
…on an elaborate journey to turn trees into music.


