

Hi all, sorry, I have been inactive on the forum for quite a while now.
Mainly because of time issues , too many things to do and new stuff to discover.
My second year in lute building class has finished and I am in the midst of building my first lute.
It will be a 7 course Renaissance lute with 11 ribs
Starting off with building a mold ..
First the baseplate from plywood

Then we add the vertical support panels , for each rib a facet, so it forms a round shape finally, notice that the top of each rib forms a straight lines , but they are angled , according to the outline of the baseplate


Then I add support blocks from mdf between each of the vertical support panels.

These too, follow the angle of the baseplate curve/angle
I coated the whole mold with varnish, to prevent glue sticking to the mold when making the ribs.
Next I made the back plate and neck heel block from a square block of basswood. The facets from the molds are brought over to this heelblock and , using a chisel tapers down to the tip of the mold.The back is a simple strip of spruce, shaped and then bent to comform to the curve of the back of the mold. the strip of spruce is just made flexible by wrapping it in a moist piece of paper towel for about 20 minutes.
Afterwards, we can bend it into the light curve of the back of the mold


For the ribs, I cut the first rib from 1.4 mm thick strips of pearwood.( planed down from approx 3 mm ) and place it on the mold.
I use a violin or guitar side bending iron to bend the the rib comform to the shape of the mold.


Next , I form the strips of veneer that will act as a spacer between each rib and also bend these into shape using heat ( with a mini iron )

Then I made the second 2 ribs, delicately trying to comform the shape of the new rib to the previous one and the shape of the mold.
Since this will be different for each of the ribs, this is a job that needs quite some time to be executed perfectly.
I only use a blockplane to shave off the high spots until the whole rib fits perfectly to the previous one, without trying to force them to meet up.


Once the ribs match , I apply the veneer on the new rib.
The glue we use for this is hot hide glue BTW.

To clamp both ribs ( and the veneer too ) I use normal masking tape.
The standard masking tape has a good elasticity I can use to my advantage. After applying glue, I tape both ribs together, but I stretch the tape and then stick it to both ribs. Once the tape sticks to both ribs, I release and the tape relaxes back, and by doing so, pulls both ribs even tighter.
Once one the first 2 ribs are glued, I rinse and repeat the procedure on the other side of the first rib. Once these first 3 ribs are joined it gets a little easier to do the next ribs, well.. sort of.. it still is pretty hard to do for a first time.


Then I remove the shell from the mold and add paper strips on the inside of the shell or bowl. These strips go over the seams of the ribs in order to strengthen the glueline and mask any possible gaps that still might have occured .
Then I start on flattening the top edge of the bowl, very carefully with a light blockplane. The shell is very vulerable still and utmost attention must be given in order not to create tearout and cracks.
This process is finished by lightly sanding the top to make it absolutely flat.


@koendb This is wonderful, I’m in awe of your work. Keep going, I can’t wait to see how you progress further with this.
Make guitars, not war 🌍✌️🎸

🗝️ "Life's what you make it"🗝️

That is impressive work, I can imagine how frustrating it must be getting all those curved edges to match up.
I realized, I havent posted something in quite a while.
Let me get on with the Lute build I started last year...
This piece of spruce will become the neck


The neck will meet the body at an angle of around 70° ( The drawing says 69°, but there is some tolerance in that because we are all humans and cant do anything perfectly right and the plan might be wrong too 😉 )
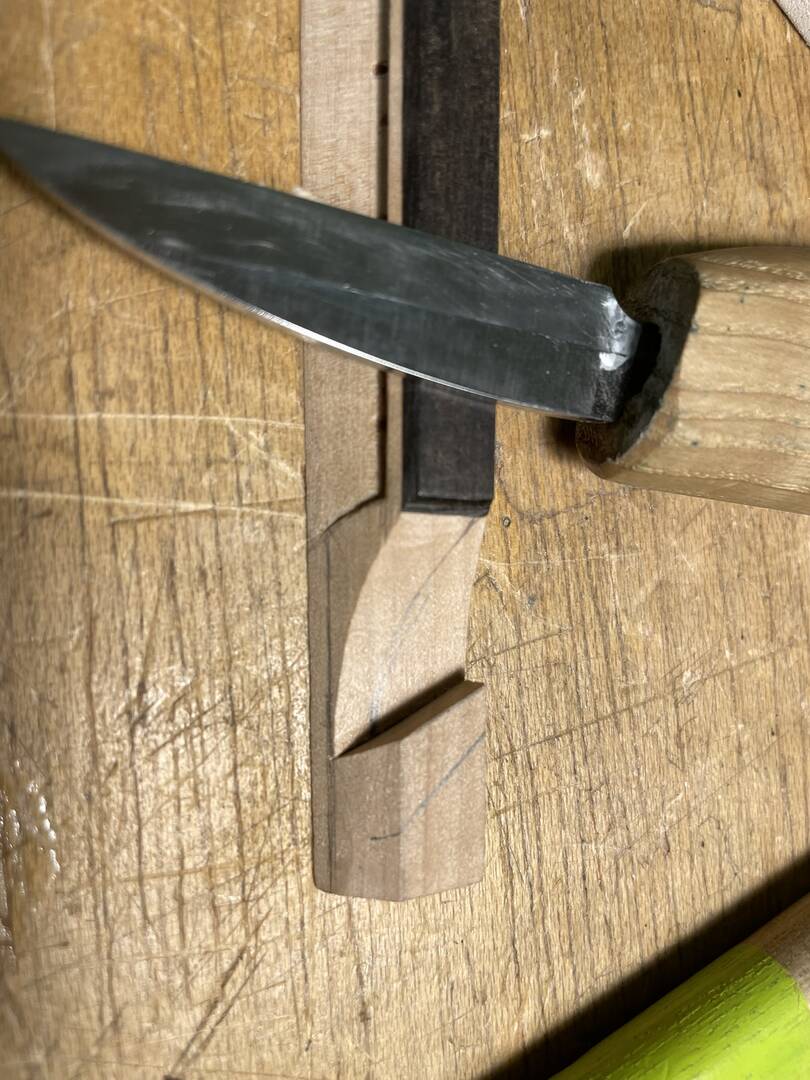
Anyhoo, after roughly cutting ( Japanese saw ) and sanding ( disk sander , platform angled for that 70° angle, or mitre) a perfectly mitre on the neck block, I needed to cut the same angle on the heelblock of the lute shell.
I marked the points on the sides and back of the shell with masking tape, so the neck would meet the shell at exactly the location it has to.
Then it is just a matter of sanding up to the lines on the disk sander with the platform unchanged. This should guarantee that the angles on both pieces match.


This is the time when I also made an endcap for the back of the shell, which will strengthen the shell, keeps the shape and at the same time, add a decorative element to hide the ends of the ribs on the back.
The shape is drawn on paper , over the shell and then transposed to a leftover piece form the ribs.
I also added a nice trim around the cap, using the same black veneer that is used as a divider between the ribs of the shell.
Finally , I heat bended the cap into the shape of the back of the shell


Time for glue up!


And the result:


Next step is to shape the neck.
This is done on a sacrificial jig, because we are going to shape the the jig together with the back of the neck. You'll see why in a moment.
I don't have footage of me actually shaping the neck, but it is the same as with a guitar neck: you set out the profile on the beginning and end of the neck, then draw lines to make facets.
But since we don't have any blocking parts, we use a plane ( I used a No5 Jack plane ) to create the facets. And as stated before, I also keep following the contour on the underlying jig.
Oh in case you are wondering: the neck is attached on the jig with a piece of paper, and 3 dots of Titebond. ( To prevent the fragile spruce fibers to be ripped out of the top of the neck. )
Later, the paper is removed and the little dots of glue are removed with a light sanding or scraping.


Next step, is to veneer the neck 's back to reinforce it and make it look nice.
I used a piece of rosewood veneer for this. The back of the veneer is first reinforced with 'licktape' At least, that is how we call it. It is a paper tape, with a glue, similar to the one used on postal stamps, so adding moisture to it, makes it sticky.
The veneer is very fragile and would crack and rip if we would not reinforce it.
Then I apply heat to the veneer with a regular household iron. This makes the veneer curl up, aiding me in gluing it to the back of the neck.


Glue up is done with hot hide glue.
The veneer is clamped around the neck and jig with cotton rope. And this is why we needed to shape the jig to follow the curve of the neck.
The jig gives support for the veneer on the point where it overhangs the neck . Otherwise the veneer would snap at the edge of the neck. The crack would follow the grain and not be precisely at the neck edge.

After a few hourse, the rope is removed and the neck is removed from the jig.
Now we still need to remove the paper from the veneer and trim down the edges of the veneer


Next up: Making the pegbox.
I started by resawing this lovely piece of curly maple, so I have a nice backplate and enough material for the sides of the box.

This box needs to be pretty precise, and is tapered. So I first glue the top and end blocks of maple to a piece of MDF. The mdf has exactly the length of the inner side of the box , according to the plan. With a temporary jig on the shooting board, I shape the taper into the two blocks and MDF. This is to make sure, the sides will have a clean and flat surface when they are glued to the top and end block. The MDF shape will later be used as a filler block when we drill the holes in the pegbox.


The end block also gets an angle so the strings will not catch on the edge.


On with the lute build!
I glued together the pegbox


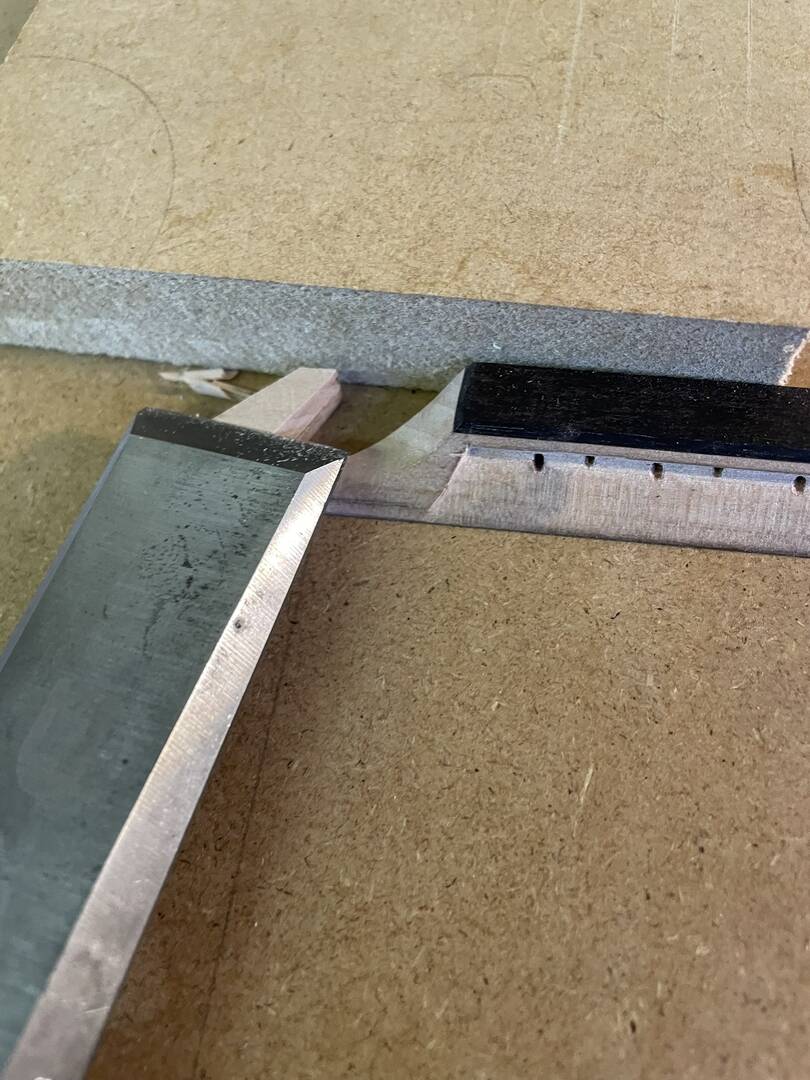
Cut an angle in the neck to seat the pegbox in. I do this with a littlejig to help me cut the correct angle with a flush cut saw.
The cut stops at 5 mm of the top the neck. and the bulk is removed carfully with a chisel and mallet


Then I shape the pegbox, trimming all sides and cut the same angle in the pegbox as in the neck


Then making sure the surface on the neck is exactly 5 mm. I am checking for level and height with a height scribe thingie ( dont know the exact word for it ) and test fitting the pegbox to the neck


Then it is time to shape the pegbox, so it will fit the outside lines of the neck perfectly, because now the sides stick out way too much as well as on the back.


Next, it is time to join the neck to the shell.
There is no way to clamp the shell as it deforms quite easily under light pressure.
Therefor, I use a jig where the heelblock is registered against a block by means of two large nails, sticking out about 3 mm from that block. The block itself is screwed into a base plate. When I press the heelblock into the nails, I can locate the dents made with the nails and I know where to drill the two small holes for the nail points. This turns those nails into locator pins and ensures that the shell will not move during glue up.
I place the shell over the block and push it backwards, so the nails slide into the holes. Then I push the neck against the heelblock and place two slats on each side of the neck. They are taped down on the base plate with double sided tape. This will ensure the neck wont slide sideways during glue up.
The neck is tightly pushed in place with a stop block and 2 wedges
I now check if the neck and heelblock have a good and tight connection. I test this with a very fine feeler gauge and remove material from the neck end with a scraper, until I cannot slide the feeler gauge between the neck and the heelblock.


The endgrain of the neck receives a coat of hot hide glue just to let it soak up a good amount of glue. In the meanwhile I heat up the gluing surface on the heelblock with a heatgun.
after a minute, I apply a generous amount of glue, join the neck and the shell and tap in the wedges.

While waiting, I drill the holes for the pegs in the pegbox.
The pegs will go all the way through to the other side of the pegbox. But to prevent tearout, I cannot just drill holes all the way through.
So I will drill holes from both sides. This has to be done very precisely because the holes do need to lign up perfectly.
To prevent tear out in the inner side of the pegbox, I fill it with the MDF spacerblock I used to make the pegbox.
We do need to make sure we drill the holes perpendicular to the centreline, not the sides of the pegbox, as the pegbox sides are tapered.
I use a simple piece of straight plywood with a line draon onto it. I then clamp the pegbox to this simple jig , aligning the centreline on the pegbox, with the line I just drawn on the jig.
Then it is just a matter of drilling the holes in the exact correct spot.


I also started working on the rosette.
After determing the right location for the rosette, I scored lines to form two bands around the rosette, using a circle cutter.
However, I dont really want to cut, so it is just a light score. You should be able to see the lines I scored , very lightly in the second picture.
Next I draw the pattern that I want to cut and start cutting the rosette.
This is one of the most relaxing jobs of the build for me. It relaxes me, and I am in my own universe while I am doing this.
Weapon of choice is a Swan Morton surgical scalpel with No 11 blades.
These blades are replaced very frequently ( maybe after every 3 or 4 figures ), because, they seem to lose their burr after that. They are still plenty sharp for other purposes, but to cut in this soft spruce, you really need the ultra sharp edge.


Thats all for now folks!


In the meantime, I finished the rosette, turned the tuning pegs and fitted them to the pegbox.
I also carved the lower inside of the pegbox for better string access


Woah! I completely forgot about this forum and the fact I did not finish my build report here.
more than 1 year since an update , djeez...
Well here we go starting where we left off in december 2024 😳
I put bracings on the soundboard. The bracings are colored with east indian ink on the parts that will be visible through the rosette.
After the ink has dried, I put a very thin coat of titebond on the inked part, just to stop the ink to seep into the top and leave nasty stains where I dont want it.

I glue them on the soundboard using a gobar deck.

I also put some smaller braces on the rosette to give it some strength

With the tiniest
Veritas block plane, I shape the braces


Making the bridge


The holes on the bass side are not all. inline, but that is because the bass strings are pairs of a thicker and thinner string , tuned in octaves.
These strings dont have whole lot of force and thus , would sound rather dull on their own, so a thinner string is added. To make sure that both strings end up at the same height, the holes of the octave strings are placed a little bit higher.

I then shape the back of the bridge, I fold it inwards with a sharp chisel, so there is only a little 'roof'just above the string holes. This will help keeping the strings in place when we tie a knot in them ( same technique as with a classical guitar )

I then add a reinforcement strip on top ( ebony ) to protect the top of the pear bridge.

Then I draw the lines to shape the rest of the bridge

Cutting away to the line with a very sharp sloyd knife.


Next, the inner curves are carved with the knife

And the ends get flattened with a chisel

Some light sanding and filing to get the last rough spots out of the way

And we are ready to put some shellac on the bridge, just a tiny coat to protect it a bit.
I am making sure the bottom of the bridge i slightly concave.
I am using a round shaped scraper to do this.
As you can see, a small ray of light is visible in the middle of the bridge.
This will help keeping the bridge glued-on.

But that bridge is now finished and we can almost start fitting it to the soundboard, but first I need to finish shaping the braces...
It s time to prepare the top to be glued on the body.
First I position the body and mark the bracings for the cuts.
The braces should really fit tightly against the side of the body.
We dont use any kerved linings in here! So all we have as glue surface are the edge of the shell and the ends of the braces.

using a template, I mark the angle of the cuts, to maximize contact with the shell.


Now it s time to bring the dhape of the soundboard closer to final dimensions.

And glue on the bridge with isinglass glue ( glue made from the blatter of sturgeon )

I also add some sound bars on the underside of the top, one being the bass bar and has a steep curve.


Then these bars are being shaped

And a message is added , because we are about to close the lid!

The soundboard gets glued to the shell!
I first start by making tiny blocks, that will help supporting the top , so the top would not fold and crack when applying masking tape with some decisive force.


In the meanwhile , I start planing the ebony fingerboard


The, after a few days , I started cleaning up the edges of the top. Very carefully, I am pairing away from the top towards the shell. The masking tape on the shell prevents marring the shell a little bit.
If I would pair away in the other direction, there would be no support for the fibers of the top and I could easily get tear out.

At the last moment, I remove half a mm with a flat file, which I have partially covered in masking tape, so I can safely ride against the shell. Here as well, I only push the file from the top towards the shell to prevent any damage on the top.

I made these little pins that will be placed at both sides of the fingerboard, around where the body meets the neck.

And cut out a section from the top where these pins will be placed.


With a firm sideways tap of a hammer, I drive the pin into the top

Rince and repeat on the other side and gue the pins in.

And the fingerboard gets placed on the neck.
Just like with a guitar, I use locating pins to be able to correctly place the fingerboard for glue up.


This is how the pins look like now, with the fingerboard attached.
I will clean that up, so you wont see any gap

This involves a lot of carefully sanding,, only From the soundboard towards the headstock, to avoid ebony dust to set into the light spruce of the soundboard.

It takes a while, but it works like a charm.
Next , I am mating the headstock to the neck, using a familiar technique, sanding the rebate flat and conforming it to the headstock, until all wiggling room is gone.

I then glue the headstock to the neck , using a jig that helps the clamp to sit in an angle.

Almost there! Cleaning up the shell, oiling the fingerboard and neck,...

cleaning up the little ridge at the headstock

And marking the nut height.

Shaping the nut


Marking out where the slots will go. These are very shallow slots, not like a guitar, the slots only keep the strings in place at the back , not the front of the nut. What you see here is actually the back of the nut.
Because the downward angle of the strings, that s all it needs to keep the strings in their place.


After a lot of polishing, the nut gets its beautiful shine.
Time to install the gut frets.
I start by adding the first string, that will help us selecting the correct fret thickness and verify tuning.

At the same time, we can also assess string height and playing action.

All looking good!
Lety's install the frets

The frets are wound around the neck and self locked using a specific knot.

And the rest of the strings are installed

What a mess those strings!

One thing still to do, on a lute there are a few wooden frets installed on the top, where the neck meets the body.
these are very thin pieces of ebony, which are glued to the top.

After marking out the location of these frets, I mark the outside lines of the fret with 2 pieces of masking tape, which will prevent the fret from sliding during glue up and also keep the glue from making a mess on the soundboard.


Then it is time to retune the strings.

Oh and I almost forgot the strapbutton!
I turned this little fellow on the lathe. This looks so cute.


Done!


