


If you don't want to read the whole discussion, here's what you need to know;
BUY ONE
Right, for those with a bit more time to read the whole topic, let's go ...
A few weeks ago, Mr Bagpress, aka @darrenking, very kindly sent me a prototype of his fretslot cutting jig and asked me to test pilot it.
Here I am in full-on test pilot mode ...
 ?v=1548519808
And, more importantly, here's the jig emerging from its packaging cocoon ...


That was v1 of the prototype.
After a little energetic test piloting, we discovered that the adjustable outer pieces of the saw guides wore a little bit as the shoulder of the saw rubbed against them. Nothing fatal, and to be completely honest, not really a problem, but I think Darren is something of a perfectionist, so he developed an improved v2 ...
Online guitar making courses – guitarmaking.co.uk
Let's play spot the difference ...
Those outer parts of the saw guide are now made of harder wearing material, and are - unsurprisingly - much harder wearing!
When Darren sent them to me, he included another 8 bolts. I wondered why. Until I realised that the new parts are slightly thinner than the original parts, so the original bolts protruded very slightly though to the inside of the jig.
Did that matter?
No, not really.
But, see comment above about "perfectionist".
😉
Online guitar making courses – guitarmaking.co.uk
This is the slotting template.

Through a clever bit of cunning design, you get 6 different scale lengths with the template.
Which is, clever.
I stuck a piece of masking tape over each end so that I could mark a centre line, and then use that to line up with the centre line on the fretboard blank. You don't need to do that if your fretboard is square and straight-edged to start with (just line up the straight edge with the edge of the template).
You can see on the photo that I wrapped the ends of the masking tape over the edges of the template. That means that the template sits *very* snugly within the jig. It just doesn't move. At all. There's absolutely no need to clamp the template in position within the jig.

All I needed to do was clamp the jig to a workbench, and then it's all solid.
The base of the jig does have 4 holes (at each corner) which is perfect if you want to bolt it to a worktop, or even to a larger piece of mdf (etc) and then clamp that to a workbench. But, this worked fine for me in test-pilot mode.
Online guitar making courses – guitarmaking.co.uk
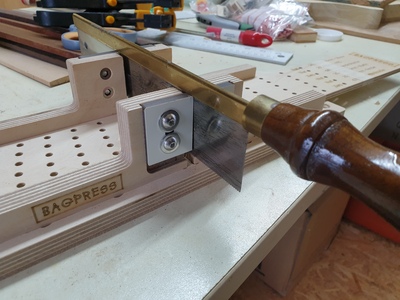
That's my StewMac fretsaw. Bought at the same time as I bought my StewMac fret slot cutting jig.
Two observations;
Firstly, the fret guides on the Bagpress jig are adjustable for height (as you'd expect) so you can cut the fret slots to the correct depth. But the right hand white guide is also width adjustable. Which means that you can widen the gap into which the saw fits by perhaps 2-3mm, allowing it to work with different saws.
Nice touch.
Secondly, having the StewMac kit, I naturally compared the two. Guess what ... the Bagpress version is cheaper - considerably cheaper. Oh, and it's better too.
Why better?
It's more accurate.
I prepared some plywood fretboards and cut some slots. I used the 25" scale on both, and then measured the distance from nut position to the 12th as 21st frets on both. Then I compared those measurements to the calculated distance from a standard fret position calculator.
The results;

I fully accept that the accuracy of my measurements are constrained by the accuracy of my steel rule (and my eyes!). I put the saw into the slot cut at the nut position, and then measured from the front-edge of the saw (to mimic the position of the nut) to the middle of the 12th and 21st frets.
As far as I could tell, the BagPress positioning was more accurate.
I think that's because of the snugness of the fit of the template into the jig. There is just no movement. The fretboard is held in perfect position as the positioning pin fits perfectly into the positioning holes in the scale template. With my StewMac jig, there's a small amount of play because the positioning pin doesn't fit as snugly or securely.
The Bagpress is also ridiculously cheaper than the StewMac alternative. It's fair to say that the StewMac kit has evolved a bit since I bought mine, and it looks far more fine-tuning adjustable now. But it's now $225.
Plus $50 for each template (which gives you 2 scale lengths).
Even if you only wanted a single template, that's still going to be £250-£300 with shipping and duties.
Ouchy.
Is the Bagpress kit as robust as the StewMac option? Perhaps not. It's ply rather than metal, so may wear a little more. If you're going to make a guitar a month, then the BagPress kit is going to be fine for a good few years. If you wanted to make a guitar a day, then perhaps the StewMac kit would be a better option.
Actually, if you wanted to make a guitar day, then you'd be buying proper industrial kit rather than the StewMac jig anyway!
So, as I said a little earlier
BUY ONE.
Online guitar making courses – guitarmaking.co.uk
@Boo - the prototype will be headed your way early next week.
@darrenking - thanks again for trusting me with it, and for the rapid responses to the feedback!
@markbailey - get these in the shop!!
Online guitar making courses – guitarmaking.co.uk


Just checked with the courier's tracking system @Boo - it's still "on its way" to you.
Though I had something delivered today (same courier company) before they'd even told me that it was out for delivery!
Online guitar making courses – guitarmaking.co.uk
@tv101 I’ve received the jig you sent from @darrenking so I’ll have a play with it this weekend (I would have a look tomorrow but it’s my wedding anniversary).

Make guitars, not war 🌍✌️🎸
(I would have a look tomorrow but it’s my wedding anniversary)
@boo - sorry, I don't really understand the problem ...
"Good morning Mrs Boo, here's a card, I'm just off to the workshop, call me when lunch is ready"
???
Online guitar making courses – guitarmaking.co.uk
I think I'll be taking your advice and buying one.
But after your bit about the masking tape for the centre line, my first thought was "why don't they laser a centre line on to the template?"
The text I assume is lasered, so adding a centre line would just be a few seconds more on the process.
Just a suggestion.


Did I miss a post saying that this jig is now available in the shop on this website?
Because it is


I did a whole livestream on it 😎 @jonhodgson Where were you!!
Measure twice, cut once...
@markbailey
I was looking at the existing threads on it, where people asked the question when it would be available!
Been a bit busy to watch livestreams.